CARTRIDGE CHALLENGE

My carts (38): A Child's Year; Accent Essentials; All Mixed Up; Alphalicious; Animal Kingdom; Base Camp; Christmas Cheer; Christmas Noel; Cursive 101; Designer's Calendar; Doodlecharms; Everyday Paper Dolls; From My Kitchen; George; Going Places; Graphically Speaking; Happily Ever After; Home Accents; Indie Art; Jasmine; Mickey and Friends; Opposites Attract; Paper Doll Dress Up; Paper Pups; Pooh and Friends; Robotz; Snow Friends; Sports Mania; Stamped; Stone Script; Storybook; Stretch Your Imagination; Tags, Bags, Boxes & More; Tear Drop; Tinker Bell & Friends; Walk in My Garden; Wedding; When It's Cold Outside.

Thursday, December 17, 2009

ATC Swap - Fuzzy

Okay--who chose this theme?? Oops, it was me. Fuzzy? I don't know what I was thinking.
I think I had some idea of fun flock and the Cricut Paper Pups cartridge. Since then I got some "Velvet Blossom Trim" in a grab box from Maya Road and decided it was a good fuzzy. But how to use it? So, here is my process and hope the final picture is an outstanding ATC.

Still wanted to use that fun flock. So, Maya Road ribbon and bugs...


YIKES!

I recently purchased some lovely stamps from Inkadinkado entitled Mindscapes. So, again, bugs and the velvet ribbon.


I think the ribbon is such a deep color that is where I am making my biggest mistake. So:


Well, better, but outstanding?? At this point I e-mailed pictures of my attempts to my wonderful sister Leslie and her response was: "Was there another option? LOL" Good ole Leslie.

Sorry some of the pictures are a little fuzzy (pun!) I think the camera needed new batteries. In the meantime and while several days pass: I want to give you a couple of links. I absolutely LOVE Maya Road products. Everything they have just appeals to me and I have purchased one or two of their items... Take a look: http://www.mayaroad.com/

Also, I would like you to see the Inkadinkado Mindscape stamps. Look closely to see that the designs are made up of other pictures. The butterfly has fairies, the dragonfly is made up of birds, the ladybug has a dragonfly, the 5 point star is butterflies and the hummingbird is also butterflies. See that butterfly that makes up the whole hummingbird wing? Here is the link: http://inkadinkado.eksuccessbrands.com/zoomimage.aspx?pid=95017

So, finally, I revisited and explored my original thoughts. Okay--maybe original ideas can work. I used the Paper Pups cartridge for the dog (of course), the card and the sun. AND I got to use that fuzzy ribbon I had. So, the ribbon, dog, and sun are fuzzy and I'm happy. And relaxed finally.

Sunday, December 13, 2009

Cricut Cartridge Storage

Before I begin my explanation of cartridge storage, I have to say that options 2 and 3 were both "designed" by Sherrie (Cricut MB name Cardjunkie). She is so clever and comes up with wonderful ideas no matter what she is working on--storage, cards, scrap pages--you name it, she has the best ideas.
I recently changed my method of storage for Cricut cartridges. I loved them in the original boxes until I got too many to store and access easily. Next, Leslie made me a "suitcase" that held the books in the bottom and velcroed the cartridges on the lid. That worked well also--until I got too many to store in that system.

So, now here is the latest storage solution which I like the best. The cartridges are held in a floss sorting plastic container available in about all crafting stores. I purchased mine at Hobby Lobby (but have also purchased them at Michael's and Joann's) for I believe about $2. It was found in the crafting area. There were also some in the sewing/floss aisle for about $5. Apparently, they cost more if you are going to store floss in them! You can store 36 cartridges in one case and then you have to quit purchasing carts. Yeah, right!


The keypad is stored inside the book and the books are set up right in this Sterilite container also purchased at Hobby Lobby. It may have been on sale at the time but was around $5. It measures about 5 1/2" high, x 8" x 13".


Then, the floss box will fit inside the large box on top of the books and everything is together and easy to carry.

Be inspired November ATC

This is our last creation for the Be inspired ATC group. We are all so busy that we are taking a break from this swap. My card is pretty simple but kind of follows my original idea--which is pretty amazing since my first ideas rarely work. Here is the inspiration:


and this is my card:

Project 365 Scrapbook

I can't believe how much time passes between my blog posts. I mean to post more, but life....

I got to do some Christmas shopping a couple of days ago. Well, I may have done a little shopping for myself also. I am so excited about this Project 365, and after consulting with sister Leslie about possible scrapbooks and scrapping options, decided to go with the 3-ring scrap binder for 12 x 12 pages. I did my shopping at Archivers with a 30% off coupon.

There were several options, including books by American Craft, We Are Memory Keepers, Pioneer and Making Memories--in fabric, fabric with stitched designs (very tempting), plain leather and embossed leather. Page protector options were the full 12 x 12 page and one with six pockets for individual photos. Prices were comparable. One company's albums were a little more, another company's protector sheets were a little more. So many choices! After emergency cell phone calls to Leslie, I finally decided on the green embossed leather from Making Memories with the full page protectors.

And here it is:

Next step on the project will be the title page.

Sunday, December 6, 2009

Project 365

At the beginning of last year I heard about Project 365. The idea is to take a photograph per day and scrap it with some brief journaling. It appears that a common layout is one week on a two page spread. I'm leaning toward that format if I think I can get 52 pages in a scrapbook.
But, of course, the most important part was preparation. I altered this composition book with Basic Grey Phoebe and LilyKate papers. I have printed some articles on the project which I will insert and also keep other ideas, lists and perhaps journaling until it is scrapped with the pictures.


Thursday, December 3, 2009

Flip flop card

I finished a birthday flip flop card. As I stated in a previous post, I made a file on design studio to cut the card. It makes it so much easier to just score to the cuts and fold. No measuring! The cut file is available. Just let me know if you would like me to send it to you.

Your card base should be cut at 5 1/2 x 6 3/4. I designed the flip flop cuts so you can line your card up in the upper left corner of your mat with no space between the edge of the sticky part and the beginning of the card edge.

The paper I used is double sided from "My Mind's Eye". Bohemia, Bliss "Darling Daughter" floral/pink. The other shades of pink on the flip are from other papers in the line. The stamp color is Cranberry from Close to My Heart. And look--I actually used some of those thousands of flowers I have purchased. I tipped the edges of the flowers with the Cranberry also.


(I have to say this looks so much better in person!)

Sunday, November 29, 2009

Gift can reaction


My nieces really loved their gift cans. And that made me very happy also. The littlest one who likes Barbie asked my sister how I knew her favorite character was Sleeping Beauty. Kids--she was supposed to think it was Barbie!! But, it worked out.

Wednesday, November 25, 2009

Father's gift card

Dad always gets a gift card from Golf Galaxy. I would have done a golf card but LESLIE borrowed my Sports Mania cart so she could make Dad a Golf Galaxy gift card holder. (No, really, I didn't have an idea anyway) So, I decided to try the flip-flop card. Jill posted on her blog the link to the Split Coast Stampers tutorial and I am including it here also: http://www.splitcoaststampers.com/resources/tutorials/swing_flip_flop_card/
The paper was left over from a project last year. I'm not sure of the manufacturer. The snowflakes are from both Graphically Speaking and from A Child's Year. The gift card will fit perfectly on the back of the flip.


I finished this at about 1:00 a.m. and went to bed. When my eyes popped open this morning, I thought I bet I can use design studio to make this card easier to make. (I hate all that measuring, partial line cutting, partial line scoring.) So, I got on design studio and after a couple of minor adjustments, I think I have it right. Below is a birthday card I'm making. I'll finish it up later, but I wanted you to see the cut. Then, the scoring lines are easy--just score to the cut. I'll give more details later.


Mother's gift card

Now, just so you know, I'm not waiting until the last minute. Our family Christmas is still a couple of days away! This is the card I made to hold Mother's Half-Price Bookstore gift card.

The card was cut from A Child's Year. The frame lines cut as strictly lines. So, I took my new utility knife because it was handy, and cut a little wider opening so you could actually see the frame. I'm thinking that I could alter it in Design Studio to widen the lines next time.

I have loved those eyeballs in Graphically Speaking since I got the cart and now I have finally used them. The book is also from Graphically Speaking. The paper is, of course, double sided Basic Grey from the Christmas set a year or two ago. The letters on the inside are the stickers from that set--not enough "r's" so two colors. The gift card will fit perfectly attached to the inside top of the card in the frame.

Tuesday, November 24, 2009

CFS altered notebook

Okay--this isn't my work, but it is my paper and notebook. I needed a place to help keep the tally on the Cards for Soldiers challenges. My sister, Leslie, designed and covered this for me. The paper is Basic Grey--my favorite company for papers.


Tinkerbell gift can

This may be my favorite can--perhaps because the flowers are so bright. I want to thank Jill for making some Tinks for me. After I did a little more planning, I decided I needed a few more cuts and bought the Tinkerbell and also the Happily Ever After cartridges.


Barbie gift can

Good morning. I should be able to post pictures of my last two gift cans. Last night I purchased the last items to go in the cans--candy bars. So, the cans will hold the photo album, gift card, candy bar, Little Dover activity book, pens, pencils, and beany baby (some I purchased years ago and finally have someone to give them to!)
For Barbie I used Disney Happily Ever After and cut Sleeping Beauty (Aurora--did you know that was her name?) I cut the crown off her head which seemed to work fine. When I told my son it was Barbie he said, it looks like a Disney character to me. Oh well. This niece is almost 5 so maybe she won't notice...


Monday, November 23, 2009

Winnie the Pooh gift can

Pooh came next and there were just too many great characters. In fact, I made too many to fit on the can and gave Kanga and Roo to a friend who was making a baby book.


Mickey Mouse gift can

This is the first can I decorated. And, the first time I had used any character cartridge to such a large extent. It was frustrating at first, but then it became more like solving a puzzle and I really started enjoying it. So, Here's Mickey and friends:


This is their photo album and gift card holder:


A Child's Year Cards and Blog Style

I changed my background. It is pretty boring but I do like that it actually uses the whole screen page. Everyone else's blogs are so fancy and pretty. Maybe I'll do my own thing; not follow the crowd; strike out in my own direction; take the fork in the road; be a lone wolf; yadda, yadda.

Okay--back to the important stuff:

These were the first cards I tried with A Child's Year. I made the two little sisters for my sister Leslie and the fairy for my daughter.


A Child's Year has some really great images on it. One feature I have found I really like is the font. It welds easily and I liked the look. I used it on the upcoming friends books that coordinate with the paint cans.

COM Plum with Points

I really did like this card. The wavy strip was some cardboard-type material my daughter found when cleaning her room. We have it in almost every color imaginable...


The "point" cut is from Graphically Speaking.


COM Pineapple with Punches

This is my creation for my Card of the Month group. The theme was Pineapple with Punches. My punch was simple--round. The metal filigree wasn't exactly what I was looking for. Apparently what I wanted is long out of production so I settled for jewelry/bead findings. Then I embossed with copper powder.


Coffee/Tea ATC

I have just been too busy with other things. Time to post some of the projects I have been working on.
This is an ATC. The image that inspired this card was a photo of coffee beans. I am just not a coffee drinker, so I had to make some tea. The card was resized on design studio using a cut from A Child's Year. The teapot stickers were Mary Englebreit that I have had for a long time. Don't you love using supplies you already have??


Saturday, September 19, 2009

Win a Gypsy from Cutting Above

Here is an opportunity to win a Gypsy. The blog http://cuttingabove.blogspot.com/ is offering you the chance to win. Take a look at their site. They have great projects and tutorials AND the chance to win.

On Sept. 24th starting at 12:00 AM on HSN Provocraft is going to have the world launch of The Gypsy. I've been watching information on this Cricut tool and am thinking maybe I need one!

Friday, September 11, 2009

Cricut's 100 cartridge celebration

Most of you are Cricut friends so you probably already know this. But, Cricut is giving away 20 cartridges per week for 5 weeks to celebrate Winter Woodland being their 100th cartridge. For a chance to win, go to this thread and register:

http://www.cricut.com/messageboard/tm.aspx?m=5248058&mpage=1

To learn more about the Winter Woodland cartridge, visit this link:

http://www.cricut.com/shopping/ProductDetails.aspx?id=361&s=1&sc=2

Thursday, August 27, 2009

Spinning wheel cards

I am doing exactly what I said I would not do. (No, not making another tri-shutter card) I am going to try a tutorial. This has gotten a little more complicated than I had intended and there probably will be much more information than you would ever need. I feel like I've written my life story.

I designed three different spinners and corresponding windows on Cricut Design Studio. One is a plain circle, the next has scallops on the edge and the last has points--I was thinking in terms of boys there. If you would like the cut file contact me and I will e-mail it to you.


Here is a picture and list of supplies that I used. Paper, Cricut with George and Christmas Cheer cartridges, scissors, Scor-it, bone folder or popsicle stick, which ever you can find easily, circle punch (mine is a 2" by Fiskars), brad, glue, ATG tape or other sticky stuff.


The cricut file has 8 mats, one for each spinner and 5 windows .

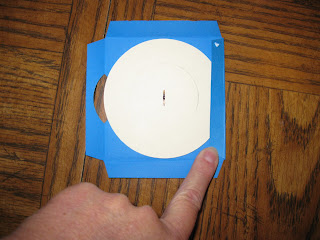
After cutting the window piece with Cricut, score it according to measurements below. I cut the corners out at a little of an angle to make a neater fold. Then fold to the back the four sides. I used my popsicle stick for a sharp crease. With your large circle punch, cut through the left folded side of the window sheet. It was just a guess on the exact positioning for the punch, but about middle of the side and cutting about 1/4 to 1/2 inch deep. The windows are a little off center so the spinner will be easier to touch and move.


The pictures show folds of 1/2 inch. It was flawed at that measurement because the points and scallops would get caught when turning. I need an arrow--see the caught point in the picture below?? So, back to the design studio. I tried a couple of different versions of the pointy circle. It still isn't the best. Even with smaller points and a larger back it still catches sometimes. So, this is my disclaimer about the pointed version. It may or may not work. Maybe I'll figure something else out some day.


Now comes something I didn't do for this demonstration. You need to print, stamp, color, your message on your wheel. If you are really clever you could use your computer to print in a circle and then cut. But, you are on your own there. The window measurements are shown below also. Attach the wheel to the window with a brad. I was thinking about an eyelet, which would work if you don't squeeze it entirely shut. However, I have the crop-o-dile, not the big bite and cannot reach the center.


When I started to glue the back flaps, I found the circle will spin better if you put down one flap, dab glue on the corner and going counterclockwise, adhere the next flap to the first, then put a dab of glue on the other side of that flap and continue. The last flap will tuck under the first. You want it to have a little room so I didn't glue super tight back there.


Here are pictures of the 6 spinners I made:


It's finally time to tape this contraption to the card. Got out my handy ATC gun and hummm, son used it last:


Okay--ready to go:


Actually, I don't have a card ready to stick the spinner to. When I get a completed card, I'll post it here.

Can you find my ruler in this mess? I love those C-thru rulers but I keep seeing through them and they get lost.


Found it--on the floor--how did it get there? Okay--now I can give you the measurements:


Supply list:

Circut

George and Christmas Cheer cartridges

Paper--cardstock

Scoring tool and bone folder.

Circle punch
Brad

Glue

Tape to adhere spinner to card

Important measurements:
Circle spinner: 3 1/2"; Inner circle: 2"

Scalloped spinner: 3-1/2"; Inner circle: 1-11/16"

Pointed spinner: 3-1/2"; Inner circle: 1-1/4" Finished size:

On all window pieces, fold the sides at a scant 1" EXCEPT if you are doing the pointed then fold at 7/8"

Banner Window: from brad to beginning of banner: 3/4"; banner height: 5/8" and width 1-5/8; finished size:

Side rectangle window: from brad to beginning of rectangle 1/4"; rectangle height: 3/4" and width 1-1/8"; finished size: 3-5/8" x 3-5/8"
Circle window: from brad to beginning of circle: 3/8"; circle size: 1"; finished size: 3-5/8" x 3-5/8"

Balloon window: from brad to beginning of balloons: 3/8"; Balloon height: 3/4" at smallest and width 2"; finished size: 3-1/2" x 3-1/2"
Thanks for taking a look and hope it's something you might want to try. Maybe you can make one and show us a picture. Or, maybe you can make some improvements to the file and share with us.