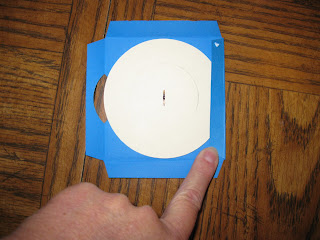
I designed three different spinners and corresponding windows on Cricut Design Studio. One is a plain circle, the next has scallops on the edge and the last has points--I was thinking in terms of boys there. If you would like the cut file contact me and I will e-mail it to you.
Here is a picture and list of supplies that I used. Paper, Cricut with George and Christmas Cheer cartridges, scissors, Scor-it, bone folder or popsicle stick, which ever you can find easily, circle punch (mine is a 2" by Fiskars), brad, glue, ATG tape or other sticky stuff.
The cricut file has 8 mats, one for each spinner and 5 windows .
After cutting the window piece with Cricut, score it according to measurements below. I cut the corners out at a little of an angle to make a neater fold. Then fold to the back the four sides. I used my popsicle stick for a sharp crease. With your large circle punch, cut through the left folded side of the window sheet. It was just a guess on the exact positioning for the punch, but about middle of the side and cutting about 1/4 to 1/2 inch deep. The windows are a little off center so the spinner will be easier to touch and move.


The pictures show folds of 1/2 inch. It was flawed at that measurement because the points and scallops would get caught when turning. I need an arrow--see the caught point in the picture below?? So, back to the design studio. I tried a couple of different versions of the pointy circle. It still isn't the best. Even with smaller points and a larger back it still catches sometimes. So, this is my disclaimer about the pointed version. It may or may not work. Maybe I'll figure something else out some day.


Now comes something I didn't do for this demonstration. You need to print, stamp, color, your message on your wheel. If you are really clever you could use your computer to print in a circle and then cut. But, you are on your own there. The window measurements are shown below also. Attach the wheel to the window with a brad. I was thinking about an eyelet, which would work if you don't squeeze it entirely shut. However, I have the crop-o-dile, not the big bite and cannot reach the center.


When I started to glue the back flaps, I found the circle will spin better if you put down one flap, dab glue on the corner and going counterclockwise, adhere the next flap to the first, then put a dab of glue on the other side of that flap and continue. The last flap will tuck under the first. You want it to have a little room so I didn't glue super tight back there.


Here are pictures of the 6 spinners I made:


It's finally time to tape this contraption to the card. Got out my handy ATC gun and hummm, son used it last:


Okay--ready to go:


Actually, I don't have a card ready to stick the spinner to. When I get a completed card, I'll post it here.
Can you find my ruler in this mess? I love those C-thru rulers but I keep seeing through them and they get lost.
Found it--on the floor--how did it get there? Okay--now I can give you the measurements:
Supply list:
Circut
George and Christmas Cheer cartridges
Paper--cardstock
Scoring tool and bone folder.
Circle punch
Brad
Glue
Tape to adhere spinner to card
Important measurements:
Circle spinner: 3 1/2"; Inner circle: 2"
Scalloped spinner: 3-1/2"; Inner circle: 1-11/16"
Pointed spinner: 3-1/2"; Inner circle: 1-1/4" Finished size:
On all window pieces, fold the sides at a scant 1" EXCEPT if you are doing the pointed then fold at 7/8"
Banner Window: from brad to beginning of banner: 3/4"; banner height: 5/8" and width 1-5/8; finished size:
Side rectangle window: from brad to beginning of rectangle 1/4"; rectangle height: 3/4" and width 1-1/8"; finished size: 3-5/8" x 3-5/8"
Circle window: from brad to beginning of circle: 3/8"; circle size: 1"; finished size: 3-5/8" x 3-5/8"
Balloon window: from brad to beginning of balloons: 3/8"; Balloon height: 3/4" at smallest and width 2"; finished size: 3-1/2" x 3-1/2"
Thanks for taking a look and hope it's something you might want to try. Maybe you can make one and show us a picture. Or, maybe you can make some improvements to the file and share with us.


