CARTRIDGE CHALLENGE

My carts (38): A Child's Year; Accent Essentials; All Mixed Up; Alphalicious; Animal Kingdom; Base Camp; Christmas Cheer; Christmas Noel; Cursive 101; Designer's Calendar; Doodlecharms; Everyday Paper Dolls; From My Kitchen; George; Going Places; Graphically Speaking; Happily Ever After; Home Accents; Indie Art; Jasmine; Mickey and Friends; Opposites Attract; Paper Doll Dress Up; Paper Pups; Pooh and Friends; Robotz; Snow Friends; Sports Mania; Stamped; Stone Script; Storybook; Stretch Your Imagination; Tags, Bags, Boxes & More; Tear Drop; Tinker Bell & Friends; Walk in My Garden; Wedding; When It's Cold Outside.

Thursday, December 17, 2009

ATC Swap - Fuzzy

Okay--who chose this theme?? Oops, it was me. Fuzzy? I don't know what I was thinking.
I think I had some idea of fun flock and the Cricut Paper Pups cartridge. Since then I got some "Velvet Blossom Trim" in a grab box from Maya Road and decided it was a good fuzzy. But how to use it? So, here is my process and hope the final picture is an outstanding ATC.

Still wanted to use that fun flock. So, Maya Road ribbon and bugs...


YIKES!

I recently purchased some lovely stamps from Inkadinkado entitled Mindscapes. So, again, bugs and the velvet ribbon.


I think the ribbon is such a deep color that is where I am making my biggest mistake. So:


Well, better, but outstanding?? At this point I e-mailed pictures of my attempts to my wonderful sister Leslie and her response was: "Was there another option? LOL" Good ole Leslie.

Sorry some of the pictures are a little fuzzy (pun!) I think the camera needed new batteries. In the meantime and while several days pass: I want to give you a couple of links. I absolutely LOVE Maya Road products. Everything they have just appeals to me and I have purchased one or two of their items... Take a look: http://www.mayaroad.com/

Also, I would like you to see the Inkadinkado Mindscape stamps. Look closely to see that the designs are made up of other pictures. The butterfly has fairies, the dragonfly is made up of birds, the ladybug has a dragonfly, the 5 point star is butterflies and the hummingbird is also butterflies. See that butterfly that makes up the whole hummingbird wing? Here is the link: http://inkadinkado.eksuccessbrands.com/zoomimage.aspx?pid=95017

So, finally, I revisited and explored my original thoughts. Okay--maybe original ideas can work. I used the Paper Pups cartridge for the dog (of course), the card and the sun. AND I got to use that fuzzy ribbon I had. So, the ribbon, dog, and sun are fuzzy and I'm happy. And relaxed finally.

Sunday, December 13, 2009

Cricut Cartridge Storage

Before I begin my explanation of cartridge storage, I have to say that options 2 and 3 were both "designed" by Sherrie (Cricut MB name Cardjunkie). She is so clever and comes up with wonderful ideas no matter what she is working on--storage, cards, scrap pages--you name it, she has the best ideas.
I recently changed my method of storage for Cricut cartridges. I loved them in the original boxes until I got too many to store and access easily. Next, Leslie made me a "suitcase" that held the books in the bottom and velcroed the cartridges on the lid. That worked well also--until I got too many to store in that system.

So, now here is the latest storage solution which I like the best. The cartridges are held in a floss sorting plastic container available in about all crafting stores. I purchased mine at Hobby Lobby (but have also purchased them at Michael's and Joann's) for I believe about $2. It was found in the crafting area. There were also some in the sewing/floss aisle for about $5. Apparently, they cost more if you are going to store floss in them! You can store 36 cartridges in one case and then you have to quit purchasing carts. Yeah, right!


The keypad is stored inside the book and the books are set up right in this Sterilite container also purchased at Hobby Lobby. It may have been on sale at the time but was around $5. It measures about 5 1/2" high, x 8" x 13".


Then, the floss box will fit inside the large box on top of the books and everything is together and easy to carry.

Be inspired November ATC

This is our last creation for the Be inspired ATC group. We are all so busy that we are taking a break from this swap. My card is pretty simple but kind of follows my original idea--which is pretty amazing since my first ideas rarely work. Here is the inspiration:


and this is my card:

Project 365 Scrapbook

I can't believe how much time passes between my blog posts. I mean to post more, but life....

I got to do some Christmas shopping a couple of days ago. Well, I may have done a little shopping for myself also. I am so excited about this Project 365, and after consulting with sister Leslie about possible scrapbooks and scrapping options, decided to go with the 3-ring scrap binder for 12 x 12 pages. I did my shopping at Archivers with a 30% off coupon.

There were several options, including books by American Craft, We Are Memory Keepers, Pioneer and Making Memories--in fabric, fabric with stitched designs (very tempting), plain leather and embossed leather. Page protector options were the full 12 x 12 page and one with six pockets for individual photos. Prices were comparable. One company's albums were a little more, another company's protector sheets were a little more. So many choices! After emergency cell phone calls to Leslie, I finally decided on the green embossed leather from Making Memories with the full page protectors.

And here it is:

Next step on the project will be the title page.

Sunday, December 6, 2009

Project 365

At the beginning of last year I heard about Project 365. The idea is to take a photograph per day and scrap it with some brief journaling. It appears that a common layout is one week on a two page spread. I'm leaning toward that format if I think I can get 52 pages in a scrapbook.
But, of course, the most important part was preparation. I altered this composition book with Basic Grey Phoebe and LilyKate papers. I have printed some articles on the project which I will insert and also keep other ideas, lists and perhaps journaling until it is scrapped with the pictures.


Thursday, December 3, 2009

Flip flop card

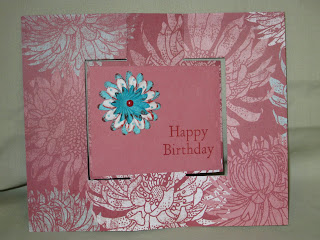
I finished a birthday flip flop card. As I stated in a previous post, I made a file on design studio to cut the card. It makes it so much easier to just score to the cuts and fold. No measuring! The cut file is available. Just let me know if you would like me to send it to you.

Your card base should be cut at 5 1/2 x 6 3/4. I designed the flip flop cuts so you can line your card up in the upper left corner of your mat with no space between the edge of the sticky part and the beginning of the card edge.

The paper I used is double sided from "My Mind's Eye". Bohemia, Bliss "Darling Daughter" floral/pink. The other shades of pink on the flip are from other papers in the line. The stamp color is Cranberry from Close to My Heart. And look--I actually used some of those thousands of flowers I have purchased. I tipped the edges of the flowers with the Cranberry also.


(I have to say this looks so much better in person!)