Here is an opportunity to win a Gypsy. The blog http://cuttingabove.blogspot.com/ is offering you the chance to win. Take a look at their site. They have great projects and tutorials AND the chance to win.
On Sept. 24th starting at 12:00 AM on HSN Provocraft is going to have the world launch of The Gypsy. I've been watching information on this Cricut tool and am thinking maybe I need one!
Saturday, September 19, 2009

Friday, September 11, 2009
Cricut's 100 cartridge celebration
Most of you are Cricut friends so you probably already know this. But, Cricut is giving away 20 cartridges per week for 5 weeks to celebrate Winter Woodland being their 100th cartridge. For a chance to win, go to this thread and register:
http://www.cricut.com/messageboard/tm.aspx?m=5248058&mpage=1
To learn more about the Winter Woodland cartridge, visit this link:
http://www.cricut.com/shopping/ProductDetails.aspx?id=361&s=1&sc=2
http://www.cricut.com/messageboard/tm.aspx?m=5248058&mpage=1
To learn more about the Winter Woodland cartridge, visit this link:
http://www.cricut.com/shopping/ProductDetails.aspx?id=361&s=1&sc=2
Thursday, August 27, 2009
Spinning wheel cards
I am doing exactly what I said I would not do. (No, not making another tri-shutter card) I am going to try a tutorial. This has gotten a little more complicated than I had intended and there probably will be much more information than you would ever need. I feel like I've written my life story.
I designed three different spinners and corresponding windows on Cricut Design Studio. One is a plain circle, the next has scallops on the edge and the last has points--I was thinking in terms of boys there. If you would like the cut file contact me and I will e-mail it to you.
Here is a picture and list of supplies that I used. Paper, Cricut with George and Christmas Cheer cartridges, scissors, Scor-it, bone folder or popsicle stick, which ever you can find easily, circle punch (mine is a 2" by Fiskars), brad, glue, ATG tape or other sticky stuff.
The cricut file has 8 mats, one for each spinner and 5 windows .
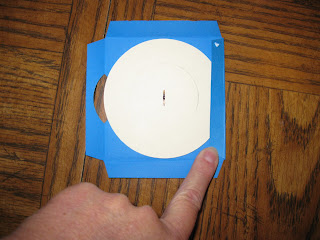
After cutting the window piece with Cricut, score it according to measurements below. I cut the corners out at a little of an angle to make a neater fold. Then fold to the back the four sides. I used my popsicle stick for a sharp crease. With your large circle punch, cut through the left folded side of the window sheet. It was just a guess on the exact positioning for the punch, but about middle of the side and cutting about 1/4 to 1/2 inch deep. The windows are a little off center so the spinner will be easier to touch and move.


The pictures show folds of 1/2 inch. It was flawed at that measurement because the points and scallops would get caught when turning. I need an arrow--see the caught point in the picture below?? So, back to the design studio. I tried a couple of different versions of the pointy circle. It still isn't the best. Even with smaller points and a larger back it still catches sometimes. So, this is my disclaimer about the pointed version. It may or may not work. Maybe I'll figure something else out some day.


Now comes something I didn't do for this demonstration. You need to print, stamp, color, your message on your wheel. If you are really clever you could use your computer to print in a circle and then cut. But, you are on your own there. The window measurements are shown below also. Attach the wheel to the window with a brad. I was thinking about an eyelet, which would work if you don't squeeze it entirely shut. However, I have the crop-o-dile, not the big bite and cannot reach the center.


When I started to glue the back flaps, I found the circle will spin better if you put down one flap, dab glue on the corner and going counterclockwise, adhere the next flap to the first, then put a dab of glue on the other side of that flap and continue. The last flap will tuck under the first. You want it to have a little room so I didn't glue super tight back there.


Here are pictures of the 6 spinners I made:


It's finally time to tape this contraption to the card. Got out my handy ATC gun and hummm, son used it last:


Okay--ready to go:


Actually, I don't have a card ready to stick the spinner to. When I get a completed card, I'll post it here.
Can you find my ruler in this mess? I love those C-thru rulers but I keep seeing through them and they get lost.
I designed three different spinners and corresponding windows on Cricut Design Studio. One is a plain circle, the next has scallops on the edge and the last has points--I was thinking in terms of boys there. If you would like the cut file contact me and I will e-mail it to you.
Here is a picture and list of supplies that I used. Paper, Cricut with George and Christmas Cheer cartridges, scissors, Scor-it, bone folder or popsicle stick, which ever you can find easily, circle punch (mine is a 2" by Fiskars), brad, glue, ATG tape or other sticky stuff.

The cricut file has 8 mats, one for each spinner and 5 windows .
After cutting the window piece with Cricut, score it according to measurements below. I cut the corners out at a little of an angle to make a neater fold. Then fold to the back the four sides. I used my popsicle stick for a sharp crease. With your large circle punch, cut through the left folded side of the window sheet. It was just a guess on the exact positioning for the punch, but about middle of the side and cutting about 1/4 to 1/2 inch deep. The windows are a little off center so the spinner will be easier to touch and move.


The pictures show folds of 1/2 inch. It was flawed at that measurement because the points and scallops would get caught when turning. I need an arrow--see the caught point in the picture below?? So, back to the design studio. I tried a couple of different versions of the pointy circle. It still isn't the best. Even with smaller points and a larger back it still catches sometimes. So, this is my disclaimer about the pointed version. It may or may not work. Maybe I'll figure something else out some day.


Now comes something I didn't do for this demonstration. You need to print, stamp, color, your message on your wheel. If you are really clever you could use your computer to print in a circle and then cut. But, you are on your own there. The window measurements are shown below also. Attach the wheel to the window with a brad. I was thinking about an eyelet, which would work if you don't squeeze it entirely shut. However, I have the crop-o-dile, not the big bite and cannot reach the center.


When I started to glue the back flaps, I found the circle will spin better if you put down one flap, dab glue on the corner and going counterclockwise, adhere the next flap to the first, then put a dab of glue on the other side of that flap and continue. The last flap will tuck under the first. You want it to have a little room so I didn't glue super tight back there.


Here are pictures of the 6 spinners I made:


It's finally time to tape this contraption to the card. Got out my handy ATC gun and hummm, son used it last:


Okay--ready to go:


Actually, I don't have a card ready to stick the spinner to. When I get a completed card, I'll post it here.
Can you find my ruler in this mess? I love those C-thru rulers but I keep seeing through them and they get lost.

Found it--on the floor--how did it get there? Okay--now I can give you the measurements:
Supply list:
Circut
George and Christmas Cheer cartridges
Paper--cardstock
Scoring tool and bone folder.
Circle punch
Brad
Glue
Tape to adhere spinner to card
Important measurements:
Circle spinner: 3 1/2"; Inner circle: 2"
Scalloped spinner: 3-1/2"; Inner circle: 1-11/16"
Pointed spinner: 3-1/2"; Inner circle: 1-1/4" Finished size:
On all window pieces, fold the sides at a scant 1" EXCEPT if you are doing the pointed then fold at 7/8"
Banner Window: from brad to beginning of banner: 3/4"; banner height: 5/8" and width 1-5/8; finished size:
Side rectangle window: from brad to beginning of rectangle 1/4"; rectangle height: 3/4" and width 1-1/8"; finished size: 3-5/8" x 3-5/8"
Circle window: from brad to beginning of circle: 3/8"; circle size: 1"; finished size: 3-5/8" x 3-5/8"
Balloon window: from brad to beginning of balloons: 3/8"; Balloon height: 3/4" at smallest and width 2"; finished size: 3-1/2" x 3-1/2"
Thanks for taking a look and hope it's something you might want to try. Maybe you can make one and show us a picture. Or, maybe you can make some improvements to the file and share with us.
Thursday, August 20, 2009
One time and one time only

Oh my gosh. I worked like a maniac on this card. Measure, cut, measure, sand, measure, glue, measure, etc. etc. And I still cut one piece wrong but I'm not gonna tell you which one. This is "cherry with chipboard" made for the card of the month swap.
I do like the look of this card, but if I ever try it again, I will go for a more simple version. I looked at several web sites for ideas and here are the links: http://craftiblog.wordpress.com/2009/05/26/2009-05-26-5-5-x-11-finished-tri-shutter-sample/ and http://craftiblog.wordpress.com/2009/04/23/2009-04-23-quad-fold-card-sample-tutorial/ and http://robinscraftroom.com/wp-content/uploads/TriShutter%20Card(3).pdf and Mary helped me again. This particular card was posted on June 23, 2009. http://kreateskards.blogspot.com/search/label/Tutorial%20-%20Cards.
I did start with a prototype that my sister Leslie finished for me and when I find the card I will take a picture. It was in black, white and beige. I thought it was boring but Leslie added pink and it really made the card look great.
Graduation Card

I've gotten these projects a little out of order. This is a graduation card I made that I scraplifted directly from Papercrafts May/June issue on page 32. The photo is mine from a trip to my parents.
July/September - Music - ATC

I cheated. I'll admit it. I am using the same ATC for two different swaps. (I think Leslie--my sister--is doing that also.)
My first thought for the music theme was my family. My parents were both music teachers and hard as they tried, they did get their four children to absorb a little knowledge. A few years ago during a family vacation we had a "talent" show. Leslie played a duet with Dad and I did with Mom. I thought those fond memories needed to be used for both of the music swaps.
August - Hand drawn - ATC

The theme for August was "hand drawn." I was having such a hard time coming up with something and in fact had posted on the MB that "I've hit a brick wall" and eureka--an idea. The bricks are colored with prisma pencils and gamsol. Title and back are printed from computer (Matisse ITC font) and the graffitti is with zig pens. Whooppee. Finished.
Saturday, July 18, 2009
July - Toy - ATC


I don't think this will photograph well, but I had the most fun working on this ATC. Our theme was "toys" and I wanted to make a working toy, so I made a flip book. I used power point to make each frame. My boys helped me get started. I'm sure it could have been much less labor intensive than it was, but I did it!
Sunday, June 21, 2009
Joy Fold Card


If you are all like me, I'm trying to use supplies I have rather than go shopping. Archivers, Joann's, Michaels, etc, are such a temptation but luckily I have to drive 40 miles to get to the nearest scrap stores.
So, I was very excited to find papers in my stash that coordinated although they were not purchased together. This card is again possible by following the tutorial Mary has on her blog at: http://kreateskards.blogspot.com/. I really like the way this turned out.
Mary has all the cut measurements on the "Joy Fold Card Tutorial - Elephants" post. The spaceship and quote are from the Close to My Heart stamp set "Reach for the Stars." The hardest part of this card was the inchie. I used DCWV adhesive cardstock and had a time getting the paper to peal from the back of the cardstock. Any hints there would be appreciated.
Fan card

I've been in the mood to try out new techniques and patterns. Luckily, I have lots of friends on the Cricut message board sharing links to web sites with lots of inspiration.
The idea for this card came from: http://ruthannzaroff.com/mirkwooddesigns/fan.htm. I used Cricut Design Studio to cut the fan blades. They are the exclamation point from Base Camp adjusted a little to get the width I wanted. The exclamation dots were hidden from the cut. I must like that silver embossing powder because I used it again with a flourish stamp from the "Love Flourishes" set by Close to my Heart. The fan blades are secured with a small eyelet installed with my crop-o-dile. When squeezing the eyelet open, there is a first and second stopping point. Squeeze easily and stop at the first hesitation and the fan blades will be able to move. Squeeze too tightly and I found they are impossible to move. A lesson learned!
Artist Trading Cards - Swap 2


The second ATC group I am a member of is from the Cricut message board. Sherrie keeps us in line (or at least tries to) on this "Be inspired" MB thread: http://www.cricut.com/messageboard/tm.aspx?m=3707215&mpage=1&key=�. There are 11 of us and all 5 months' cards are now shown. My card this month was inspired by a greeting card Mary demonstrated on her blog. It is the stair step card and the tutorial was June 2. Mary has a wonderful blog with great tutorials. They are very easy to understand and have great illustrations and instructions. Check out her work: http://kreateskards.blogspot.com/.
Artist Trading Cards

[I just finished the most wonderful blog entry and pushed the wrong button...so here we go again]
I am in two ATC swaps. It is amazing what can be put on these little 3 1/2 x 2 1/2 inch cards. The first swap has been going on for over a year and has 14 members. Karen organizes us, sorts the cards and mails them to each of us. Her blog is http://www.paperockscissors.blogspot.com/ and you should be able to see cards from all the swaps.
This month's theme was angels. I have been using my computer more and typed the saying (an angel can illimunate the darkest path) on white cardstock. The background is prisma colored pencils and the gamsol technique. I then embossed with silver the angel from the Stampin Up! set Holy Triptych. I also embossed the edges.
I haven't quite figured out how to get the pictures where I want them on my postings.
Friday, June 12, 2009
Post #1

I never thought I would be a blogger. And, this may not go far--but, I needed a spot to post an entry to a challenge. So, here is my experiment.
This card is for the Cuttlebug Challenge #35. It's the first challenge I've ever entered. The theme was favorite movie and so, here's looking at you kid...
Subscribe to:
Posts (Atom)